Testing Workflow
In Advanced workflows, Siren provides a powerful Test Mode inside the Workflow Editor to simulate how your flow will execute in real-time. To enter test mode:- In the top navigation bar of the Workflow Editor, toggle from Editor to Test.
- You’ll now see an Input JSON panel on the left side of the screen. This allows you to modify and test with different input values.
The test payload consists of two keys:
data: Custom values used inside the workflow, such as names, flags, or attributes used in conditions or variable substitution.notify: Recipient details like email, phone number, or push token. Example:
- Edit the values as needed and click Run Flow.
- The visual editor will show how the flow executes, which branches are followed, and whether any nodes fail.
Triggering Workflow
Once your workflow is tested and ready, click Publish in editor. Published workflows can now be triggered externally via API. Siren supports two types of runtime triggers:Single Trigger
Use this when targetting a single recipient.- Endpoint:
POST https://api.trysiren.io/api/v2/workflows/trigger - The
notifyfield is an object - The
datafield is shared context used throughout the workflow
Sample Request
Bulk Trigger
When sending notifications to multiple recipients, use the bulk trigger. Thenotify field becomes an array, each item representing a unique recipient.
This is useful when sending messages like alerts, reminders, or promotions to a list of users in one API call.
Example
Scheduling Workflow Triggers
Siren allows you to schedule workflows to run automatically at specific intervals without manual triggers. This is useful for recurring tasks like sending daily reports, reminders, or maintenance notifications. You can access the Schedules section from the left navigation panel under Workflows > Schedules.Schedule List View
Once inside, you will see:- A list of all previously scheduled workflows
- A Search bar to quickly find a schedule by name
- Filters to refine the list
- An Add Schedule button to create a new schedule
Creating a New Schedule
Clicking on Add Schedule will prompt you to enter a Schedule Name. Once added, you are redirected to the schedule configuration screen.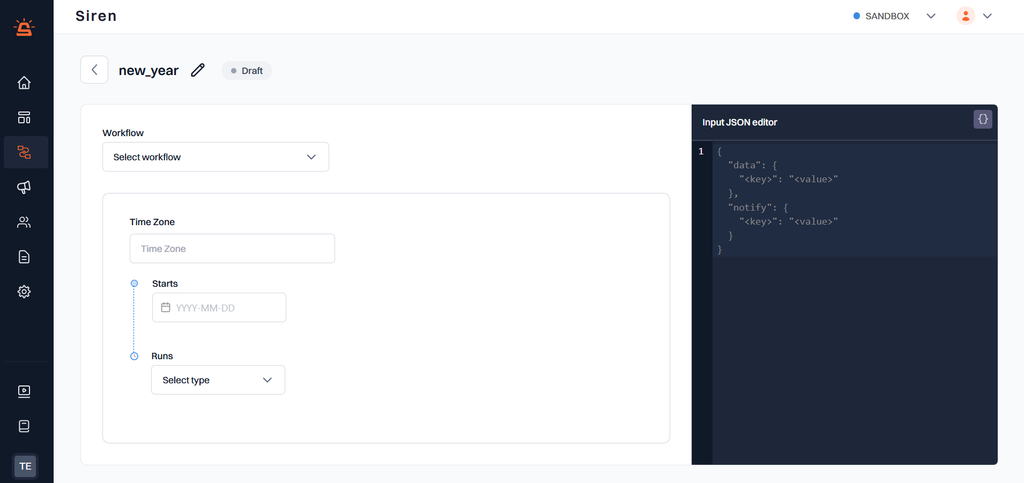
Schedule Configuration Options
On the schedule creation screen, you’ll find the following input fields:- Workflow: Select the workflow you want to schedule.
- Time Zone: Choose the time zone in which the schedule should run.
- Starts: Pick a date for the schedule to begin (
YYYY-MM-DD). - Runs: Choose how often the workflow should run:
- Once – Specify a time (
HH:mmformat). - Daily – Select a time, and optionally an end date.
- Weekly – Pick specific weekdays and a time.
- Monthly – Choose:
- First day of the month
- Last day of the month
- Custom day of the month
- Once – Specify a time (
- Ends: (only for recurring schedules)
- Never – The schedule runs indefinitely.
- On – Specify a date to stop the schedule.
JSON Body
Users have the option to input a JSON body for the workflow trigger. This JSON allows you to:- Pass dynamic values to the workflow
- Provide user-specific data under the
dataobject - Specify recipient details under the
notifyobject Example:
Managing the Schedules
Once you have configured everything and click Update, the Schedule will be active After scheduling:- A Pause Schedule button will appear in the bottom right.
- You can use this to temporarily pause the scheduled workflow without deleting it.
- To restart it, click Resume, and the schedule will continue from its configured timing.
- You can view all existing schedules and their current status in the Schedule List. To modify a schedule, simply click the Edit button next to it in the list.
No actions can be performed for completed schedules.