> ## Documentation Index
> Fetch the complete documentation index at: https://docs.trysiren.io/llms.txt
> Use this file to discover all available pages before exploring further.
# Control Nodes
Control nodes help your workflow make decisions and branch based on conditions or variable values. Siren currently supports two types of control nodes:
* **If Node** — used for binary conditions (true/false paths)
* **Switch Node** — used for multi-branch routing based on values
***
## If Node
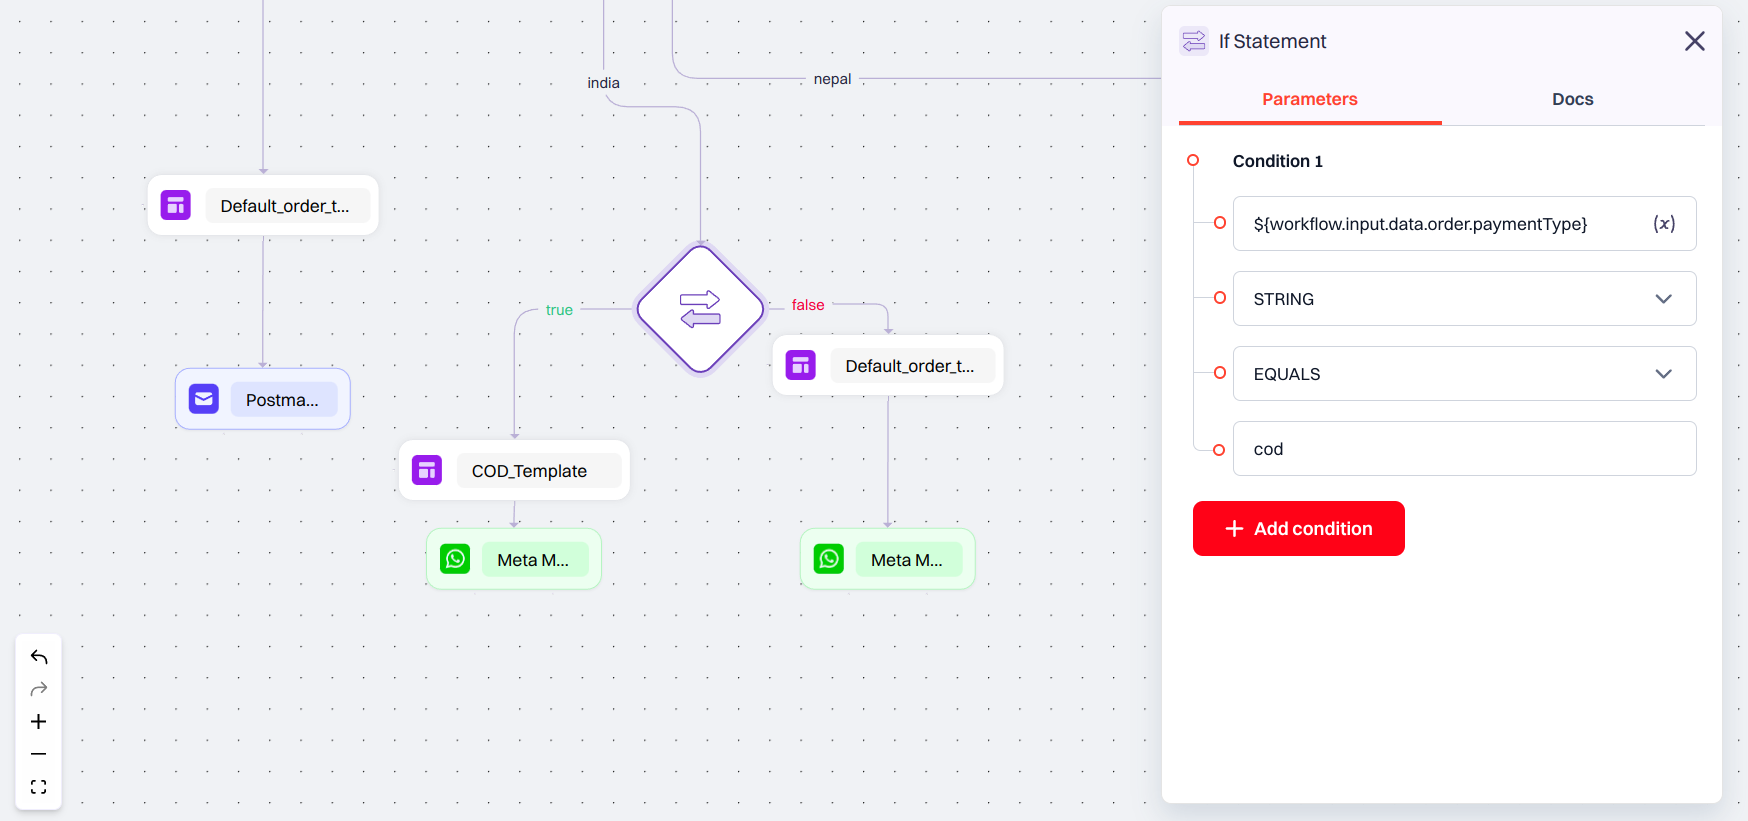
The **If Node** allows you to define one or more conditions, and split the workflow based on whether the condition(s) evaluate to **true** or **false**.
 ### Basic Workflow Configuration
In a Basic workflow, you can configure only **one condition**.
Each condition has the following fields:
* **Value A** – This is the **input source**, typically a JSON path pointing to data pulled from your system, database, or even a prior node.
* **Type** – The expected data type for comparison, such as `STRING`, `NUMBER`, or `BOOLEAN`.
* **Comparison Operator** – How you want to compare the two values. Options include `EQUALS`, `NOT EQUALS`, `GREATER THAN`, etc.
* **Value B** – The **reference value** you are comparing against. This is usually the value entered by the user or a static condition.
If the condition evaluates to true, the workflow continues along the **true** path. Otherwise, it follows the **false** path.
### Advanced Workflow Configuration
In an Advanced workflow, the If Node becomes more powerful. You can:
* Add multiple conditions
* Combine them using **AND** / **OR** logic
* Use dynamic data from external APIs or workflow input using JSON paths
> #### Example
>
> Imagine you need to send notification to a user whose ID is verified and check their country if India use one provider, if USA use another provider. So use the if node in advanced workflow for this.
>
> * A user submits their **country**, and if their ID is **verified or not verified**.
> * Your backend fetches the corresponding details of the user from the database and passes it to Siren.
>
> You can configure the **If Node** like this:
>
> * **Value A**: `${workflow.input.data.country}` (value retrieved from your database)
> * **Type**: `STRING`
> * **Operator**: `EQUALS`
> * **Value B**: `India` (the Country the user entered)
>
> This checks if the submitted country matches the required one.
>
> The other branch can look like this, where Value A fetches from the database whether the person's ID is verified or not.
>
> * **Value A**: `${workflow.input.data.verification}`
> * **Type**: `STRING`
> * **Operator**: `EQUALS`
> * **Value B**: `verified`
>
> These conditions can then be combined using **AND** logic — so the workflow proceeds only if both checks pass.
***
## Switch Node
The **Switch Node** is used to split the workflow into **multiple paths** based on the value of a variable, similar to a `switch-case` logic in programming.
### Basic Workflow Configuration
In a Basic workflow, you can configure only **one condition**.
Each condition has the following fields:
* **Value A** – This is the **input source**, typically a JSON path pointing to data pulled from your system, database, or even a prior node.
* **Type** – The expected data type for comparison, such as `STRING`, `NUMBER`, or `BOOLEAN`.
* **Comparison Operator** – How you want to compare the two values. Options include `EQUALS`, `NOT EQUALS`, `GREATER THAN`, etc.
* **Value B** – The **reference value** you are comparing against. This is usually the value entered by the user or a static condition.
If the condition evaluates to true, the workflow continues along the **true** path. Otherwise, it follows the **false** path.
### Advanced Workflow Configuration
In an Advanced workflow, the If Node becomes more powerful. You can:
* Add multiple conditions
* Combine them using **AND** / **OR** logic
* Use dynamic data from external APIs or workflow input using JSON paths
> #### Example
>
> Imagine you need to send notification to a user whose ID is verified and check their country if India use one provider, if USA use another provider. So use the if node in advanced workflow for this.
>
> * A user submits their **country**, and if their ID is **verified or not verified**.
> * Your backend fetches the corresponding details of the user from the database and passes it to Siren.
>
> You can configure the **If Node** like this:
>
> * **Value A**: `${workflow.input.data.country}` (value retrieved from your database)
> * **Type**: `STRING`
> * **Operator**: `EQUALS`
> * **Value B**: `India` (the Country the user entered)
>
> This checks if the submitted country matches the required one.
>
> The other branch can look like this, where Value A fetches from the database whether the person's ID is verified or not.
>
> * **Value A**: `${workflow.input.data.verification}`
> * **Type**: `STRING`
> * **Operator**: `EQUALS`
> * **Value B**: `verified`
>
> These conditions can then be combined using **AND** logic — so the workflow proceeds only if both checks pass.
***
## Switch Node
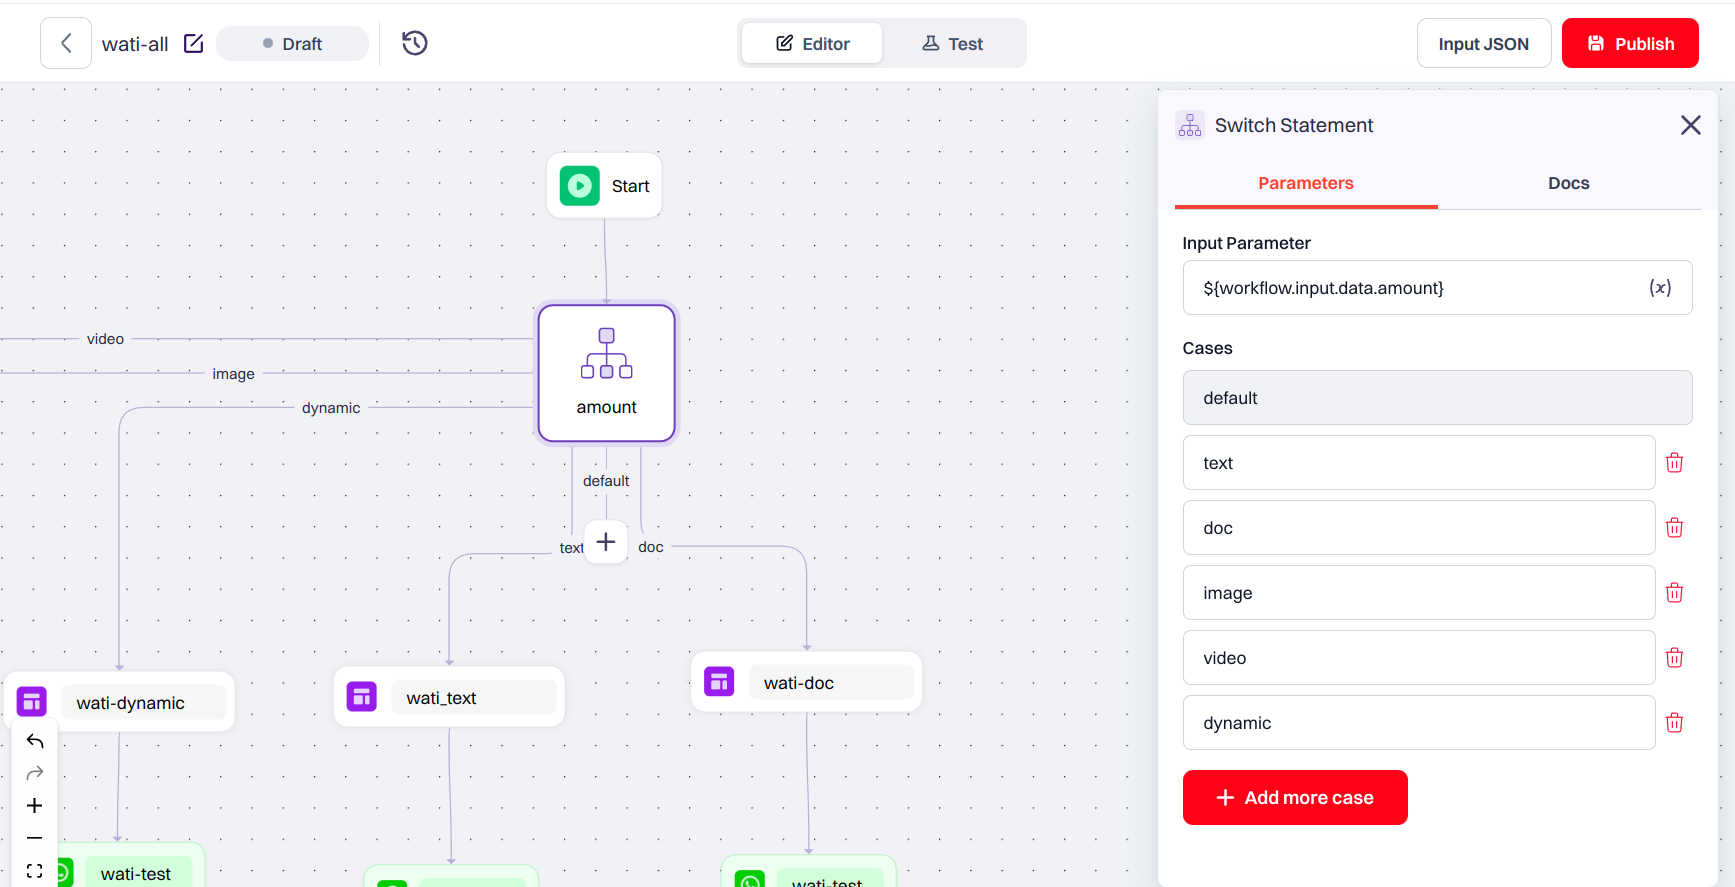
The **Switch Node** is used to split the workflow into **multiple paths** based on the value of a variable, similar to a `switch-case` logic in programming.
 ### Basic Workflow Configuration
In Basic mode, the switch has a **Name** field and allows defining up to **9 cases**, including a **default (fallback)** case.
* Each case is a **static value**.
* You can route each case to a different set of nodes.
* The **default** route will be used if no match is found.
### Advanced Workflow Configuration
In an Advanced workflow, you will see a **Switch Expression** field instead of a name.
* Enter a **JSON variable path** (e.g., `${workflow.input.data.}`) to evaluate dynamically.
* Add up to 9 cases to match the expression.
* Just like in Basic mode, one fallback case is always present by default.
> #### Example
>
> Suppose you want to notify users based on their preferred channel.
>
> * Use `${workflow.input.data.channel}` as your **Switch Expression**
> * Add cases like `email`, `sms`, and `push`
> * Connect each case to the respective channel’s template node
> * Let the fallback case handle any unknown or missing channel values
>
> This allows you to streamline multi-channel workflows in a clean, organized way.
***
### Basic Workflow Configuration
In Basic mode, the switch has a **Name** field and allows defining up to **9 cases**, including a **default (fallback)** case.
* Each case is a **static value**.
* You can route each case to a different set of nodes.
* The **default** route will be used if no match is found.
### Advanced Workflow Configuration
In an Advanced workflow, you will see a **Switch Expression** field instead of a name.
* Enter a **JSON variable path** (e.g., `${workflow.input.data.}`) to evaluate dynamically.
* Add up to 9 cases to match the expression.
* Just like in Basic mode, one fallback case is always present by default.
> #### Example
>
> Suppose you want to notify users based on their preferred channel.
>
> * Use `${workflow.input.data.channel}` as your **Switch Expression**
> * Add cases like `email`, `sms`, and `push`
> * Connect each case to the respective channel’s template node
> * Let the fallback case handle any unknown or missing channel values
>
> This allows you to streamline multi-channel workflows in a clean, organized way.
***